This is a LONG post, but hopefully a helpful one! The instructions as published in the magazine are different from the ones in my own version from my Ravelry shop. The following information pertains to the magazine version but the concept will be similar for both versions. Specific information about my Ravelry version is in the following post.
Pineapple Peasant Top Round 20: Split for Sleeves: Place those markers!
This round could be the trickiest because it’s only working in SOME of the previous pineapples while leaving other pineapples alone!
FIRST- read and count carefully! Visualize that there are now going to be 4 distinct sections: front, back, left sleeve, right sleeve. If you slip what you’ve already got on over your head, and pinch it together under your arms you’ll get the concept. You are actually going to use those stitch markers to replace your pinching… because it would be a little difficult to crochet it while it was still on you…
Read and count again and get those stitch markers in place!
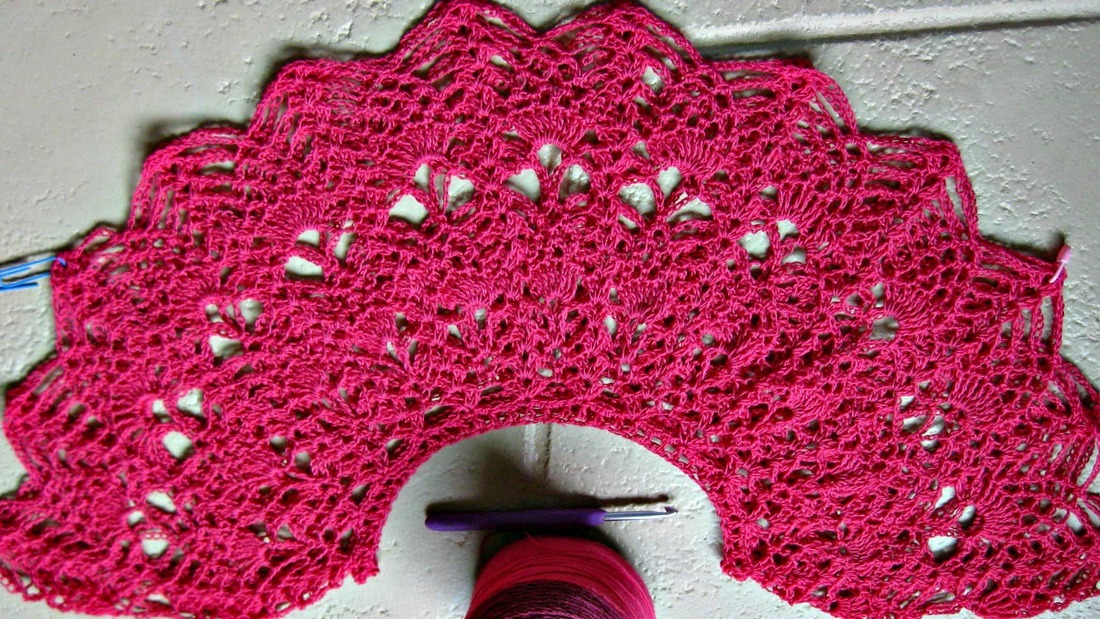
You can see in my photo (imagine that I’m standing on my head here…) that I have it laid nice and flat and have connected the very first shell of the round with the 6th shell (being held together with the pink stitch marker on the right side of the photo). So that first stitch marker is NOT at the very edge of the garment… remember, we’re pinching together right at the underarm, so that section to the right of the stitch marker will be the first sleeve.
Then, count over the appropriate number to match the size you are making. Since I am making the L/XL, I counted over to the 13th shell, and clipped that one together with the 18th shell (the blue paper clip near the left side of the photo). The section to the left of that second stitch marker will be second sleeve.
That now means that the layers in the between the stitch markers will be the front and back of the body, and those are the only pineapples we will be working on from now on.
NOW you can start crocheting, with the first shell of Round 20 being worked through both of those shells at the first marker, joining them together at the underarm.
Next, work across the body section.
When the second marker is reached, work the next shell through those 2 shells joining them together at the other underarm. You will not be working in any stitches on the sleeve section, but instead work across the next body section and join to the beginning of the round. Nothing else will be done with the other sleeve either until the very end.
Try on your garment! This is a great place to make sure that your armholes aren’t too tight and that your garment isn’t too tight across your bust. If needed you can adjust.
My yarn: Red Heart Yarns It's a Wrap
Pineapple Peasant Top Round 20: Split for Sleeves: Place those markers!
This round could be the trickiest because it’s only working in SOME of the previous pineapples while leaving other pineapples alone!
FIRST- read and count carefully! Visualize that there are now going to be 4 distinct sections: front, back, left sleeve, right sleeve. If you slip what you’ve already got on over your head, and pinch it together under your arms you’ll get the concept. You are actually going to use those stitch markers to replace your pinching… because it would be a little difficult to crochet it while it was still on you…
Read and count again and get those stitch markers in place!
You can see in my photo (imagine that I’m standing on my head here…) that I have it laid nice and flat and have connected the very first shell of the round with the 6th shell (being held together with the pink stitch marker on the right side of the photo). So that first stitch marker is NOT at the very edge of the garment… remember, we’re pinching together right at the underarm, so that section to the right of the stitch marker will be the first sleeve.
Then, count over the appropriate number to match the size you are making. Since I am making the L/XL, I counted over to the 13th shell, and clipped that one together with the 18th shell (the blue paper clip near the left side of the photo). The section to the left of that second stitch marker will be second sleeve.
That now means that the layers in the between the stitch markers will be the front and back of the body, and those are the only pineapples we will be working on from now on.
NOW you can start crocheting, with the first shell of Round 20 being worked through both of those shells at the first marker, joining them together at the underarm.
Next, work across the body section.
When the second marker is reached, work the next shell through those 2 shells joining them together at the other underarm. You will not be working in any stitches on the sleeve section, but instead work across the next body section and join to the beginning of the round. Nothing else will be done with the other sleeve either until the very end.
Try on your garment! This is a great place to make sure that your armholes aren’t too tight and that your garment isn’t too tight across your bust. If needed you can adjust.
My yarn: Red Heart Yarns It's a Wrap
 | This design is available as an individual pattern on Ravelry here. And was also published in the Happily Hooked Magazine May 2018 issue which is also available on Ravelry! |
May 9 - Pineapple Peasant Top Round 20 - Split for Sleeves - https://www.facebook.com/groups/HHMCAL/permalink/2532192053673339/